Sunday, October 28, 2012

Yam Cake


As you can see this is not a chinese steamed yam cake. It is a layered sponge cake filled with yam. I found this recipe from Carol's book and her blogs and she made this into a swiss roll instead.

I added some yam puree into this sponge cake and as a result the cake is soft and moist and it gives a light aroma after baking.


If you can read chinese, you can also refer to Carol's blogs for her recipe.


My yam cake recipe:

Yam filling ingredient:
  • 300g yam steamed and puree
  • 40g fine sugar
  • 15g butter
  • 50g fresh cream(milk)


Method:
1) Peel and cut yam into smaller pieces, place it into the steamer and steam yam till cooked and puree it.
2) Add in the sugar, butter and cream or milk. Mix well.


Yam sponge cake ingredient:

Yolk mixture:
  • 5 yolks
  • 30g fine suger
  • 40g olive oil or vegetable oil
  • 100g yam steamed and puree
  • a pinch of salt
  • 90g cake flour
  • 25g milk
Egg white mixture:
  • 5 egg whites
  • 1/4 tsp of cream of tartar
  • 60g fine sugar
For cake decoration : Whipped cream.
Method:
  • 1) Beat egg yolks and sugar till creamy and sugar dissolved. 
  • 2) Mix in the olive oil, yam puree and salt , mix well. 
  • 3) Add in and mix well the half portion of the sieved flour first, then follow by a half portion of the milk to mixture. 
  • 4) Add in and mix well the last portion of the flour and milk to the mixture. Set aside.
  • 5) Whisk egg whites till foamy first, then add in cream of tarter and fine sugar and continue whisking until soft firm peak. 
  • 6) Fold in 1/4 of the egg white mixture to the yolk mixture first, folding it till well combine. Mix and fold the rest of the yolk mixture to the egg white mixture until well combine. Do not over mixing the batter.
  • 7) Pour the batter on to a 43x30 cm baking tray lined with baking paper.
  • 8) Bake at preheated oven at 170°C for 12-15mins.
  • 9) Removed the cake from the tray immediately when it is out of the oven, place it on the cooling rack. Removed paper at the side of the cake so as to avoid drying out the cake. 
To assemble cake:
  • 1) When the cake is cooled cut it into equal parts, top it with the yam filling. 
  • 2) Place the 2nd layer sponge cake on the filling, then top it with the filling again. 
  • 3) Place the last piece of cake with the baked side downward,  please refer to my photo below. 
  • 4) Final decoration, I covered the whole cake with some whipped cream.


Friday, October 26, 2012

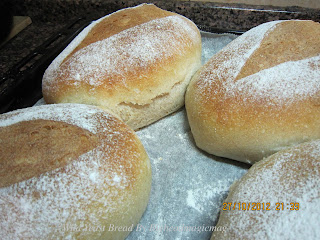
Wild Yeast Bread

Update photo on wild yeast bread


I've been trying out wild yeast bread making for many years but will always give up after a few try, not because the bread didn't rise properly but somehow it taste sour and my children don't like it.  You might think that wild yeast bread should taste sour since it is also known as sourdough bread but it is not suppose to be so.

I recently happen to come across an article about wild yeast bread baking and realized that the duration of the proofing of the dough will determine the sourness of the bread. If I feed my starter in the morning and complete my baking on the same day, my bread will not taste sour at all.  In other words, the shorter the fermentation period the less sour the finished product will be. Bread made within a single day using wild yeast starter will produce a loaf that is not noticeably sour. Overnight fermentation will give a slightly more pronounced sour taste.
Wild yeast starter


Fluid starter ingredient:

Method:

  • 1)Mix all the ingredient together in a big mixing bowl.
  • 2) Cover it and set aside to cultivate in the room temperature for 4 to 6 hours
fluid starter

Main dough ingredient:

  • 300g fluid starter from above
  • 300g bread flour
  • 125ml milk
  • 2 Tbsp of brown sugar
  • 80g yam cooked and pureed
  • 1/2 tsp salt
Method:

yam puree


  • 1) Using a standing mixer, Put all the ingredients except 10% of the milk ( for adjustment in case the dough is too wet) and salt  into the mixer and mix on low speed until just combine. Let the dough rest for 30mins.  Add in the salt and continue mixing on low speed until  the dough reaches a medium level of gluten development.
  • 2)Transfer the dough to a lightly oiled container. Cover and let  dough rises until doubled in size it takes about 3 hours.
  • Cut and shape the dough and place it into a bread pan lined with baking paper  and let dough proof for another about 2 to 3 hours.  
  • When dough with 1/2 inch of the top of the pan, bake it in  a preheated 200°C oven for about 30mins or till it is done.
  • Remove the bread from the baking pan. Transfer onto a wire rack and let cool completely.


Tuesday, October 23, 2012

Tiramisu Mousse Cake


Hi Everyone,
It's been a long time since my last post. I'm Sorry!
Anyway, Today I'm going to post the recipe for my daughter's 16 y.o. birthday cake.
Well as you can see my skill of frosting is still bad, but this cake tastes really nice, and I will try making it again.
Bigheadmagicmad


For the savoyardis biscuit(lady finger biscuit) and chocolate coffee sponge recipe,
I referred to Carol's book "The First Book of Baking for Beginner's" and her blogs.

For the tiramisu mousse and coffee syrup recipes,  I referred to Aunty Yochana blogs.

My Tiramisu Mousse Cake Recipe

Ingredient for savoyardi biscuit ( lady finger biscuit) :
Yolk mixture
  •  4 yolks
  •  20g fine sugar
Egg white mixture
  •  4 egg whites 
  • 1/4 tsp of cream of tartar
  • 60g fine sugar 
100g cake flour
some icing sugar, for dusting.

Method:
  • 1)Whisk egg yolks and sugar till fluffy. 
  • 2)Whisk egg whites till foamy first, add cream of tartar and fine sugar continue whisking until soft peak. 
  • 3)Fold egg white mixture into the yolk mixture, then add in the 100g cake flour. Mix and folding the flour slowly until well combine. Do not over mix the batter. 
  • 4)Fill the batter into a piping bag fitted with 1 cm or smaller plain nozzle. Pipe finger biscuit onto a baking tray lined with baking paper. Dust with icing sugar and bake at preheated oven at 170°C for 12-15 mins. For crispier finger biscuit, continue baking at 120°C for another 15 mins or until the finger biscuit is dry. 
You can see how Carol makes the lady finger biscuit with photo here.


Ingredient for chocolate coffee sponge cake:- 

Yolk Mixture
  • 3 yolks 
  • 30g fine sugar 
  • 40g vegetable oil
  •  1Tbsp instant coffee
  •  50cc hot water
  • 20g cocoa powder
  • 95g cake flour
  • 1Tbsp kahlua
Egg White Mixture
  • 3 egg whites
  • A pinch of cream of tartar
  • 30g fine sugar
Method:
  • 1)Dissolve instant coffee in the hot water, leave to cool.
  • 2)Beat egg yolks and sugar until  creamy and sugar dissolved. Mix in the vegetable oil, coffee mixture, the cake flour and kahlua, and combine well.
  • 3)Whisk egg whites till foamy first, then add cream of tartar and fine sugar continue whisking until soft peak. 
  • 4)Fold in 1/4 of the egg white mixture into the yolk mixture first, folding it till well combine. Mix and folding the rest of the yolk mixture to the egg white mixture until well combine. Do not over mix the batter. 
  • 5) Pour the batter on to a 43cm x 30cm  baking tray lined with baking paper.
  • 6) Baked at preheated oven at 170°C for 12-15 mins or till done.
  • 7) Remove the cake from the tray immediately when it is out off the oven, to avoid drying out the cake. Leave to cool before cutting out two 7inch cakes .
You can see how Carol makes the chocolate coffee sponge cake here.


Ingredient for tiramisu mousse:
  • 2 egg yolks
  • 1whole egg
  • 60g fine sugar
  • 8g gelatine powder(soak in 2 Tbsp of cold water)
  • 250g mascarpone cheese
  • 200g whipped cream( whipped)
  • 2 Tbsp kahlua 
Ingredient for coffee syrup:
  • 15g instant coffee powder
  • 200g warm water
  • 2 Tbsp kahlua

Topping with some chocolate ganache and grated chocolate for final decoration.

Method:-
For tiramisu mousse:
  • 1)Beat egg yolks, whole egg and sugar over a pot of simmering water. Make sure that pot is not sitting directly on the  hot water. Whisk till egg yolk is lemony in color. Leave cool to room temperature.
  • 2)Soak gelatine powder with water and microwave for about 20-25 secs. Add to the egg mixture.
  • 3)Add in mascarpone cheese and mix lightly. Don't over mix otherwise the cheese will be coarse.
  • 4)Fold in the whipped cream and kahlua. Combine and set aside.
For coffee syrup:-
  • 1) Mix all the ingredients together in a bowl. Mix well and set a side.
You can see how Aunty Yochana makes the tiramisu mousse and coffee syrup here.


To assemble the cake (8 inches tiramisu mousse cake):
  • 1) Line the cake pan with aluminum foil. Lay lady finger biscuits around the perimeter of the 8 inch pan, and place a piece of 7 inches chocolate coffee sponge cake at the bottom of the pan.  Brush coffee syrup onto the biscuit and sponge cake. Spoon 1/4 of the tiramisu mousse on top of the sponge cake. 
  • 2)Place 2nd layer with finger biscuits and brushed finger biscuit with coffee syrup, and top with mousse filling. 
  • 3)Third layer, do the same as 2nd layer.
  • 4)Place the 4th layer with chocolate coffee sponge and brush with coffee syrup. Top with remaining tiramisu mousse filling and sprinkle the top with grated chocolate. Cover cake with plastic wrap and refrigerate for few hours or overnight.
  • 5)Remove cake from the pan, place it onto a plate and decorate with chocolate ganache.